VSCode Walkthrough: Installing OCaml in 1 Click

Software Engineer
We are making it easier to get started with OCaml! We support the growth of the OCaml community, and feedback suggests that installation is a common pain point for newcomers. To improve their experience, we need to ensure that the pathways to installation and setting up projects are smooth. Recently, this effort has produced a walkthrough in VSCode for setting up OCaml, essentially a ‘one-click installation’ using opam.
This post will introduce the new feature and show you how it gets new users started.
Why VSCode?
VSCode is by far the most popular editor among beginners, mainly thanks to its helpful UI, which gives users plenty of support: welcome/setup panels, interactive menus, selection tools, and so on. By targeting VSCode first we are making installation easier for newcomers, and the feedback we gather will also provide maintainers with insights they can use to improve other workflows.
Our goal with creating a walkthrough was to reduce friction by minimising reliance on external documentation and the terminal for setup. One of the first challenges when installing OCaml is understanding where to find and install what you need to start writing code. Even if you do know where to find everything, it can be challenging to get to it all in the right order. OCaml.org has an installation guide, which is a great resource, but it’s a lot of information to take in and can be hard to parse for some users.
The Walkthrough
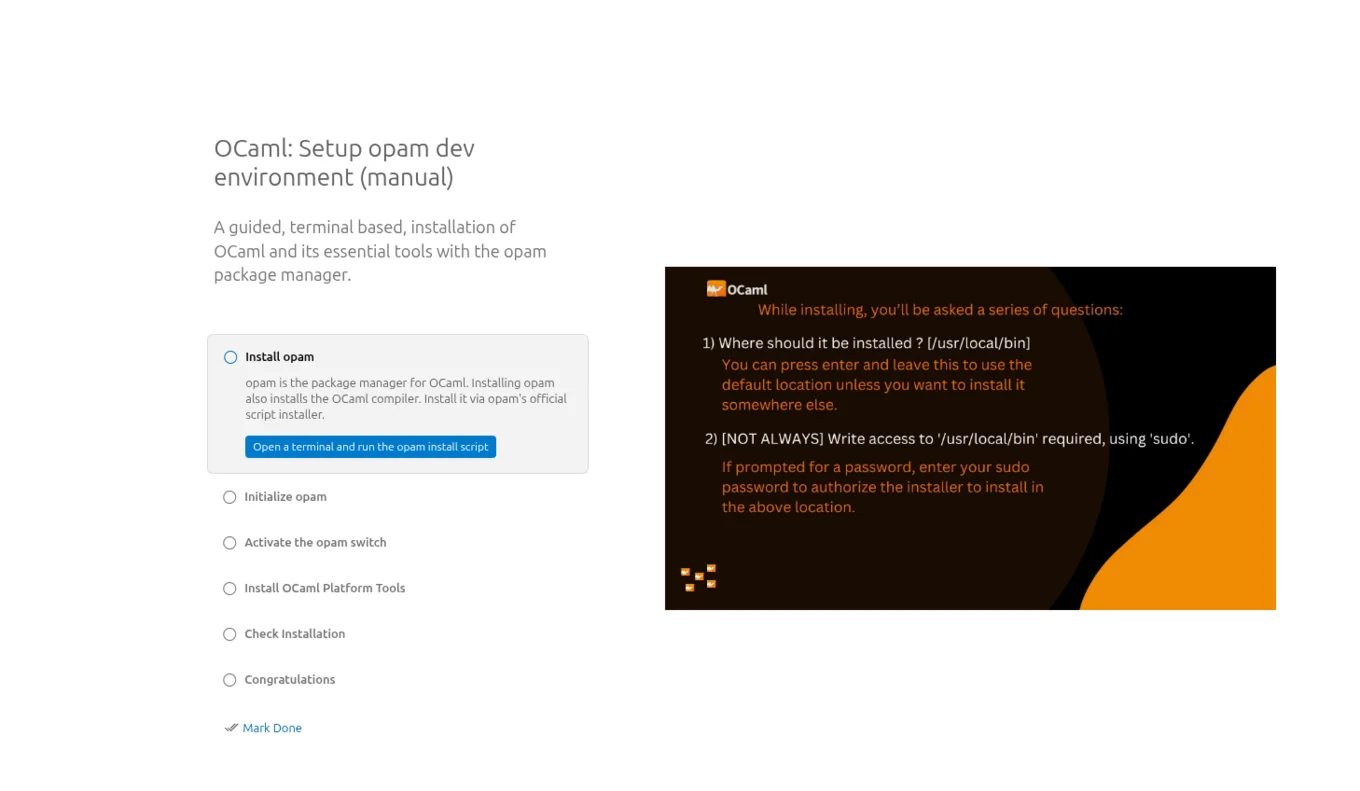
The new VSCode walkthrough opens a window when you install the OCaml plugin. The page guides you through five steps, providing clear instructions and a UI that indicates when each step is in progress and when it succeeds. When you click on a step, the walkthrough opens an integrated terminal and completes it for you.
The steps are:
- Install
opam: First, VSCode opens a terminal and runs theopaminstall script. - Initialise
opam: Second, VSCode opens a terminal and runsopam init. Initialisingopamprepares your system to useopamto manage OCaml packages and compilers. - Activate the
opamswitch: This step prompts you to select and activate theopamswitch. It explains that anopamswitch is an isolated OCaml environment where you can install different versions of OCaml and packages. - Install Platform Tools: The next click installs some key OCaml tools:
duneas a build system, OCaml LSP for editor support,odocto generate documentation,ocamlformatto format code, andutopas an interactive REPL. - Check Installation: This step verifies the OCaml installation by running
utop. - Congratulations: Success! OCaml is installed, and you are asked to fill in an optional feedback form.
Here's what the start screen for the walkthrough looks like:
Having both VSCode and the VSCode extension OCaml Platform installed will automatically open the walkthrough. Should you need to manually open the walkthrough after installing the OCaml Platform extension, start by clicking on the help menu in the top right corner, then select ‘open walkthrough’, and select the one titled ‘OCaml: Setup opam dev environment (manual)’.
Until Next Time!
There are still changes we are looking to make the coming months. Using the input from the feedback form, we want to improve the walkthrough as well as simplify the documentation on OCaml.org to reflect the new changes. Once Dune Package Management has its first full release, we also plan to create a similar walkthrough for that workflow to support its users.
You can connect with us on Bluesky, Mastodon, Threads, and LinkedIn or sign up for our mailing list to stay updated on our latest projects. We look forward to hearing from you!
The featured image of this post contains the logos of OCaml, Dune, and opam. They are shared under a liberal license, MIT license, and the GNU lesser general public license respectively.
Open-Source Development
Tarides champions open-source development. We create and maintain key features of the OCaml language in collaboration with the OCaml community. To learn more about how you can support our open-source work, discover our page on GitHub.
Explore Commercial Opportunities
We are always happy to discuss commercial opportunities around OCaml. We provide core services, including training, tailor-made tools, and secure solutions. Tarides can help your teams realise their vision
Stay Updated on OCaml and MirageOS!
Subscribe to our mailing list to receive the latest news from Tarides.
By signing up, you agree to receive emails from Tarides. You can unsubscribe at any time.